Bus werkt niet

Hallo

Ik ben nieuw met Velbus en heb een nieuwe installatie in mijn nieuwbouw. Ik wil deze beginnen programmeren maar heb een probleem met de bus.

Ik maak connectie via de Signum (via usb). Als ik via de software Velbuslink een scan die van de bus, vind hij zonder problemen.

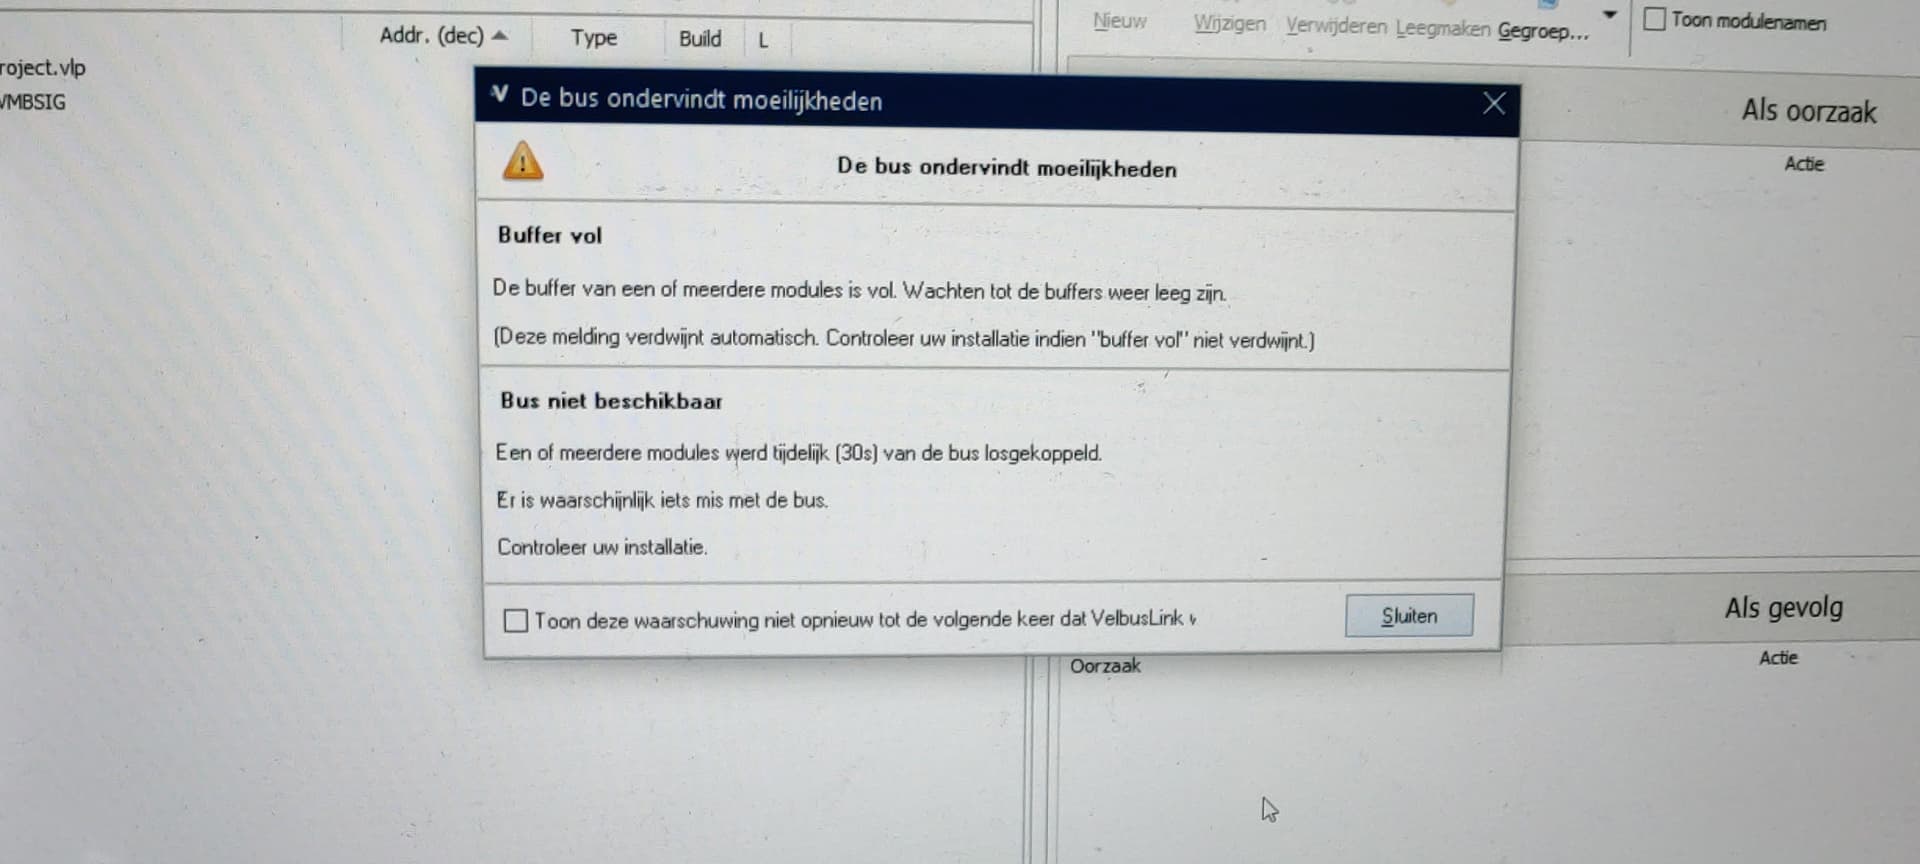
Vanaf ik de lus aansluit met alle drukknoppen (VMB2PBAN-R), vind hij de modules in de kast niet meer maar vind hij ook niets van de lus zelf. Hij geeft ook een bus error (maar zegt niet wat het probleem is).

Ik heb de kabel uitgemeten (voeding is tot op het einde van de bus 15V en de weerstand van de communicatie aders ( H en L) is 110 Ohm).
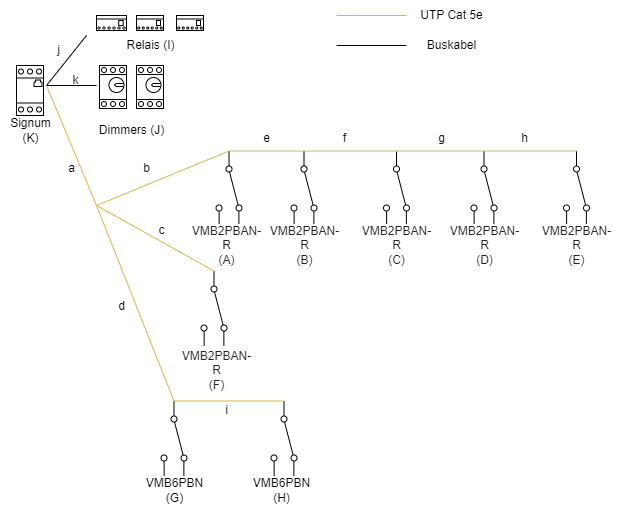
Op de buskabel zijn 2 terminal aangesloten

De buskabel vertrekt vanuit de kast en splitst dan in 2 buskabels.

Ik heb al vanalles geprobeerd (1 drukknop op de bus aansluiten, vanaf de splitsing 1 buskabel loskoppelen, terminals van plek veranderd, …) maar niets lijkt te werken.

Heeft er iemand nog iets dat ik kan proberen?

Have you crossed over the data pair at some point?

1 Like

I have checked al the pairs and connections but everything is connected correctly.

1 Like

Okay, it was a good starting point.

The next path to go down it simply splitting the bus cable in halves until it works.

then rebuild until the fault returns.

I had this once, about 6 years ago, where there was a strange cable fault between two glass panels.
We never did find it, we simple used different cores in the cable (thankfully the installer had used a multi strand cable, against my advice)

Just keep finding the half way point in the wiring and opening the DATA connections.
Maybe the power pair too

“You will find it”

Ik heb vandaag nog wat testen gedaan van de lus en geprobeerd om te fouten te vinden maar tevergeefs.
Zelfs wanneer ik maar 1 drukknop aansluit op be lus kabel, komt deze niet online en vallen alle modules in de kast weg.
Wanneer ik de lus koppel op de modules in de kast, krijg ik een bus error en de melding dat de buffer vol zit.

Weet iemand wat dit wilt zeggen?

Ummmm

That suggests that there is a direct short in the loop on the DATA pair.

Half the loop and only connect one leg


Dat suggereert dat er een directe kortsluiting is in de lus van het DATA-paar.

Halveer de lus en verbind slechts Ă©Ă©n been

Hi

I have created a Fault finding interactive PowerPoint slide deck.

Can you test it for me, to see that I haven’t missed anything.

Sorry it is in English, if the team like it, we can translate it to Dutch.


Hallo,
Ik heb een interactief PowerPoint-diapresentatie gemaakt over het opsporen van fouten.

Kun je het voor mij testen, om te zien of ik niets gemist heb?

Sorry dat het in het Engels is, als het team het leuk vindt, kunnen we het naar het Nederlands vertalen.

https://www.velbus.co.uk/dl/training/EN_Velbus_FAULT_FINDING.pptx 2.5MB

Or you can view it in your browser here

@PrzemoF
Is this any use to your Spanish installation team?

One other thought

“End of Line Termination”

Velbuslink 11 is more sensitive to Terminator placement.

Too many can cause that popup message, as does too few.


Nog een gedachte

“Einde van de lijnbeëindiging”

Velbuslink 11 is gevoeliger voor Terminator-plaatsing.

Te veel kunnen dit pop-upbericht veroorzaken, net als te weinig.

I will test this the first time I am there.

I will test/check the PowerPoint as fast as possible.

1 Like

Have you more information about this?

The PowerPoint file can be viewed in a browser now on ANY device,

The LONG answer is…

If following the PowerPoint slide show doesn’t resolve the issue, can you note when the Error popup appears and disappears?
This will help narrow down the testing.

It is possible that you do need to

  • Add
  • Remove
  • Move

a terminator or two around your system, to balance the data and stop any data echos.

These are the little black switched or black jumpers on modules.

Ideally, you would have only TWO on the whole system, as far apart as possible.

However, sometimes they need to be moved around a little to find the sweet spot or a third one adding.

The short answer…

I need to talk to the team in Belgium about this PPT file, before we create more.


Het LANGE antwoord is…

Als het probleem niet is opgelost door de PowerPoint-diavoorstelling te volgen, kunt u dan aangeven wanneer de pop-up Fout verschijnt en verdwijnt?
Dit zal het testen helpen beperken.

Het is mogelijk dat u dit wel nodig heeft

  • Toevoegen
  • Verwijderen
  • Beweging

een of twee terminators rond uw systeem, om de gegevens in evenwicht te brengen en eventuele gegevensecho’s te stoppen.

Dit zijn de kleine zwarte geschakelde of zwarte jumpers op modules.

Idealiter zou je er maar TWEE op het hele systeem hebben, zo ver mogelijk uit elkaar.

Soms moeten ze echter een beetje worden verplaatst om de goede plek te vinden of een derde toe te voegen.

Het korte antwoord…

Ik moet met het team in België over dit PPT-bestand praten voordat we er meer maken.

I have tested some more.
The test of using just one DATA pair, wasn’t working. If connect just one pair (H or L), noting will appear.
As a test, I have used a new cable between my cabinet and the first push-button (to check if there is a short in the cable somewhere), but the result was the same.
The ppt is very good, but doesn’t work with me. I have done all the tests in it but it would not work.
Then I have tested with playing with the terminators, but that didn’t work.

To be more clear about the installation,I have created a schematic of it (this is just the first floor, the others will be connected later).

When the UTP cable a is disconnected, I will see the relais and dimmers. But from the moment I connect this cable again, everything will disappear, only the Signum will be visible and I receive a bus error and buffer full.

If I disconnect the relais and dimmers and connect cable a, then I will see nothing. When I was testing, I disconnected cable d for most of the time. I putted a jumper on F and on E but this didn’t work. When i played with the jumpers, I only received bus errors, buffer full errors ore nothing.

What i noticed is that when someone pushes a button, this button will come online for the short moment when the button is pushed. When the button is released, it will disappear again. This behavior I only noticed on A, B and C. The others not.

I hope, you have some more things I can try?

if you disconnect everything from the UTP cable - would you be able to measure if there is a short in the cable itself ? with everything disconnected you should not get any shortcircuit and its an easy test

1 Like

Thank you for trying the PPT file, when we find this fault, I’ll add your scenario to it.

That’s a massive clue.

It tells us that some is killing the data pair, as soon as you connect.

“Buffer full” in this case is suggesting that nothing can be sent to the bus, because the timing marker is missing.

Interesting

This would suggest a tiny mechanical error in the cable at the location of the button that is being pressed.

I’m sorry to say this, but I think you need to disconnect all downstream modules and just focus on getting one working at a time

Ie

Disconnect section c, d & e

Test

Connect section c

Test

Disconnect section i

Connect section d

Test

Connect section i

Test

Disconnect section f

Connect section e

Test

Disconnect section g

Connect section f

Test

And so on

If that doesn’t find it, I have another idea

Which is kind of the opposite of the above.

I wish I lived nearer, I’d pop round and help you find this crazy fault.

It works!

But I’m a little bit embarrassed about the solution.
To split the bus, I use Wago’s. And it seems that the Wago’s sometimes where connecting to the plastic of the bus cable and not the copper.

So after checking all the Wago’s, everything worked.

The strange thing is, that don’t have to use any terminal. From the moment I use one, I lose the connection.
So that is strange … But it works!

The next step is to connect the cabinet of the second floor. That’s a bigger one. I hope this one will go smoother.

Thanks already for all the help!

1 Like

Only a wise and honourable person would share the fine detail little that, a lesson for everyone.

I salute you sir.

It works, so it is perfect.

If using another Velbus bus supply in that cabinet, remember you only need to connect the 0v, data low & data high to the rest of the system.

But with what you’ve learnt in this process, the next step will be painless.

:partying_face:

1 Like