Hello,
I’ve read on a Velbus document that it’s easy to have big light on day and a reduce one on night.
I would like to do that (with VMB4PD and VMB1DM).
Thanks
Hello,
I’ve read on a Velbus document that it’s easy to have big light on day and a reduce one on night.
I would like to do that (with VMB4PD and VMB1DM).
Thanks
Hi Golfy 
If you’re talking about 2 different light fixtures then it’s fairly easy to do with timer actions.
But if you’re talking about setting different levels within the same dimmer channel, it’s not impossible, just takes a few more program steps to achieve.
You have my direct email, just drop me a note.
Cheers
MDAR Ltd.
Here is a solution. As always, other possibilities may exist.
The idea is to have an on/off button that between 07:00 and 23:00 switches a light at 100% power, and between 23:00 and 07:00 (at night) switches the same light at 25% power. For instance in a night hall, so you’re not blinded at night when going to the toilet.
Basic setting is an input module (anything with push buttons), and a dimmer module (VMBDMI, VMB4DC according to need).
Configure in Velbuslink the following 3 actions:
Initiator: Push Button 1
Subject: dimmer channel
Action: Toggle inhibit (48)
Initiator: (Virtual) Push Button 2 (we’ll call it “100%”)
Subject: dimmer channel
Action: Atmosferic dim value (32), dim percentage: 100%
Initiator: (Virtual) Push Button 3 (we’ll call it “25%”)
Subject: dimmer channel
Action: Atmosferic dim value (32), dim percentage: 25%
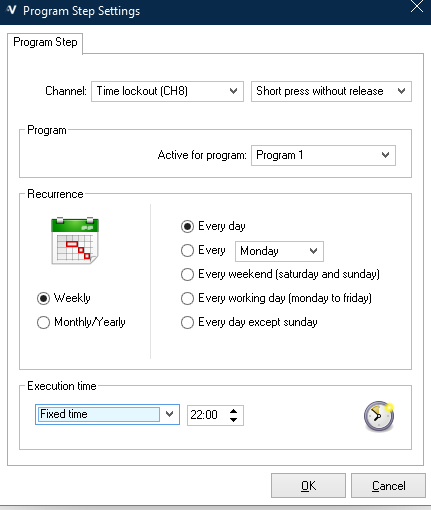
What we’re going to do now, is to program button 2 (100%) to be pressed every day at 07:00, and button 2 (25%) to be pressed every day at 23:00. Then we use push button 1 (our on/off toggle), to suppress or release the dim channel, which will have the effect of an on/off toggle.
So in the input module, go to Module Configuration > Program steps, and add following two steps:
Don’t forget to write the changes to the modules (using synchronize).
That’s it. To start of, activate push button 2 or 3 (according to the time of day) manually (using Velbuslink for instance). From now on push button 1 will act as a standard toggle, and the light power will change automatically according to the time of day.
(As always, make sure you work with a recent version of Velbuslink, you can download it from the Velbus website.)
This is useful but is there a way to also enable the bathroom fan to work when the light is on during both day and night - I’ve got a fan that is connected to my light when they turn on using the toggle for the fan. But using the above, is making the fan to turn on during the day even though the light is off.
Got setup like this - but when the program runs it makes the fan not work in line when the lights are on.
Any help would be welcomed
Are you getting to get the fan to simply follow the light?
Maybe with a bit of over-run, so the fan stays on after the light it turned off?
If so, try an action with the light (output device channel, not the button) as the initiator and the fan relay as the Subject
And use action “Delay Off” 0504
Yes like to follow the fan to follow the light with a bit of over-run for about 5-10mins after the light is switched off.
Thanks for the below advise will try.
On the above details provided by VEL345, the problem I’ve got is, come morning, the light is automatically turned on when the program for 100% kicks in.
Any advice.
This is the setup I’ve got for the fan and light switch button as follows:
Oh I see
So the light has a timer action that brings it on, outside of human interaction.
I see your issue.
Can you put a “Force Off” in place to lock out the fan?
Or change how the light is operated?
I think you must decide “Who is the master” in this situation?
What I’m trying to do is do the diming during the night in the bathroom like Golfy but want the fan to also come on when the lights are on and then turn off after few minutes.
Ultimately trying to achieve the following:
Right.
So this bit you have now with the On and Delay off action
Just this part to resolve
Which is more about defining which button is triggered when the user wants the light on
Are you perhaps setting your timer to mimic the button press, rather than locking and unlocking the buttons?
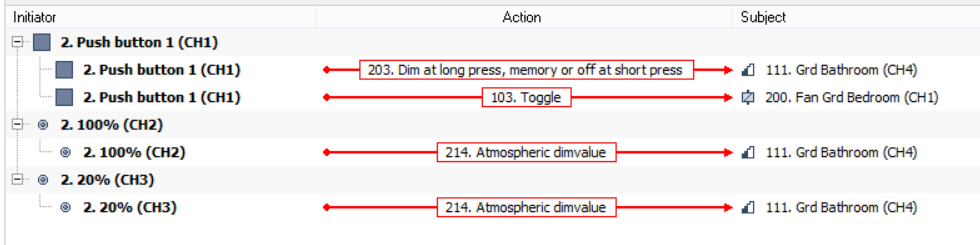
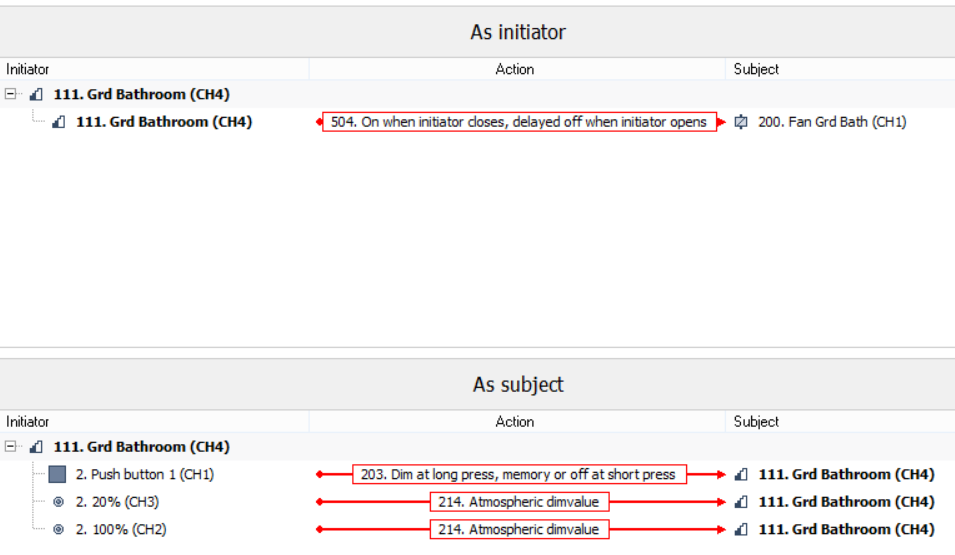
I see you have actions linked to button 1, 2 and 3 on that panel, I think that is your issue.
Do you have 2 spare Virtual relays in your setup?
Yes the above is correct
Button 1 is the actual button
Button 2 and 3 are virtual buttons currently - which is done from VEL345 post above.
Yes got 2 spare virtual relays available in my setup currently - but unsure how we can use them or program them for day/night modes
Or if there is any other approach if need to use the virtual relays in future for something else e.g. via a clock / program at changing from 100% / 25% dim
Just to make your intention super clear in my head
(following Vell345 logic)
Do you intend for this light to be ON 24 hours a day, and just vary the intensity at given times?
OR
That you want a User to press A button at any time and the intensity be set according to the time of day?
If this
There is a complex way in Velbus only or a fairly easy way in openHAB or Node-RED
Do you have any kind of computer connected to your Velbus system for a UI ?
Hi,
Want “a User to press A button at any time and the intensity be set according to the time of day”
Not got computer connected at the moment so velbus only for now, but do also share both approaches via velbus and OpenHab/NodeRed, so when do get computer connected can update accordingly.
Many thanks in advance for your help and advice
Right, I thought as much.
Let’s look at a concept for Velbus only Control.
(The attached VLP file have dummy modules in it, with the actions and config)
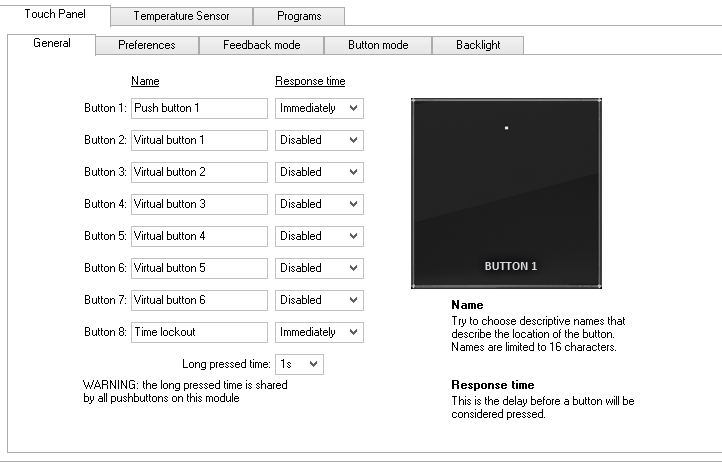
Setup any input device button for control.
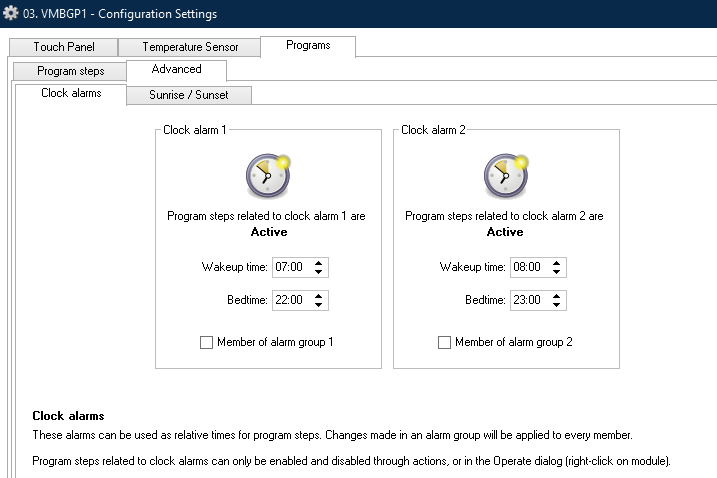
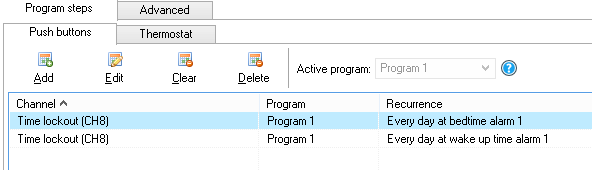
Setup the input module with a timer.
I have used the Wake up and Bedtime option, because this feature can be edited with a OLED panel AND from openHAB / Node-RED etc
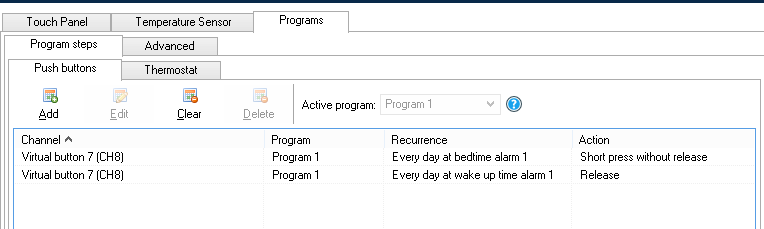
Activate a Virtual button and use it as the lockout trigger.
PRESS without release at BedTime 1
RELEASE at WakeUp 1
The times for these are set in the Advanced tab.
(Note the Group member option, Enabling this means that ALL panels in the group will reflect any changes you make, instead of ONLY being for that panel)
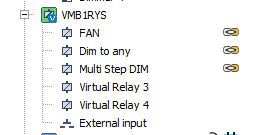
Using any relay, setup a couple of channels to act as mimics for the Input button.
Set very simple “Follow / Momentary” actions between the Input button and the two relay channels
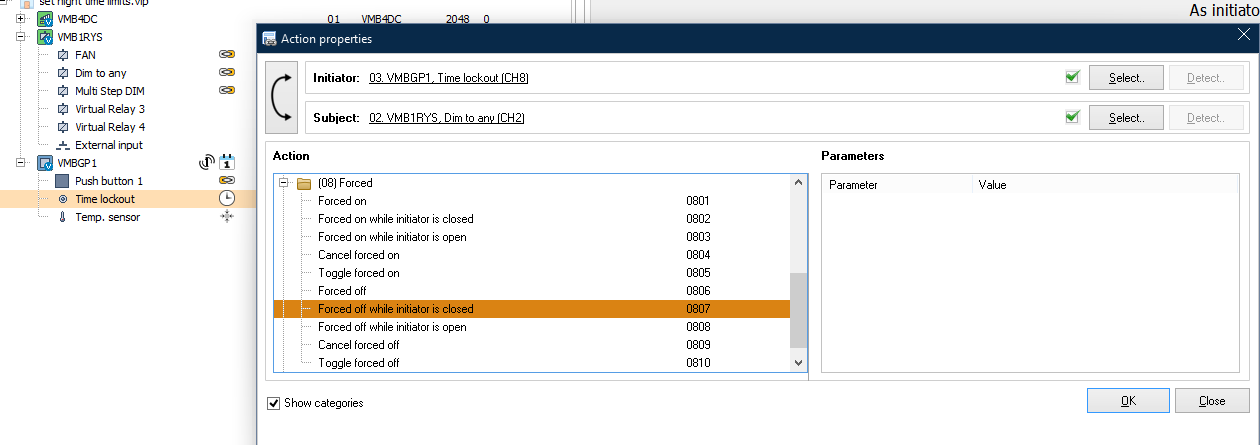
Now comes the clever bit
Set TWO actions for the virtual button.
One to each of the Virtual relay channels.
0807 Force OFF when Closed to the DAY time mimic
0808 Force OFF when Open to the night time mimic
This will effectively change the function of the Input button at the given times.
(You could do lots of these, if you have the will to do so)
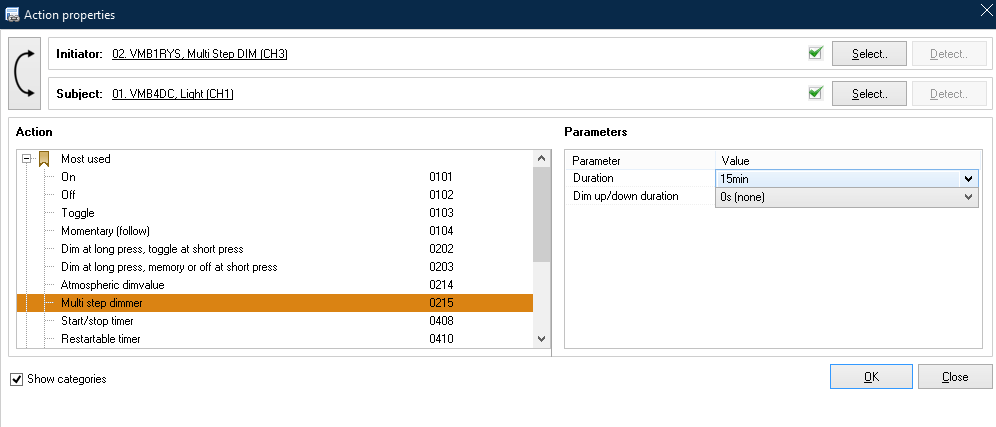
Next we must set what these mimics do at the given times.
The first is simple, let’s let the user choose whatever dim level they like, but adding a simple “0202 Dim on long press”
This next step is the magic…
I didn’t realise it had this feature when I set it up for some coloured lights I have here, where I wanted a “Press for exact colour” “press again for off”
Little did I know I could press and hold to vary the intensity of that colour too.
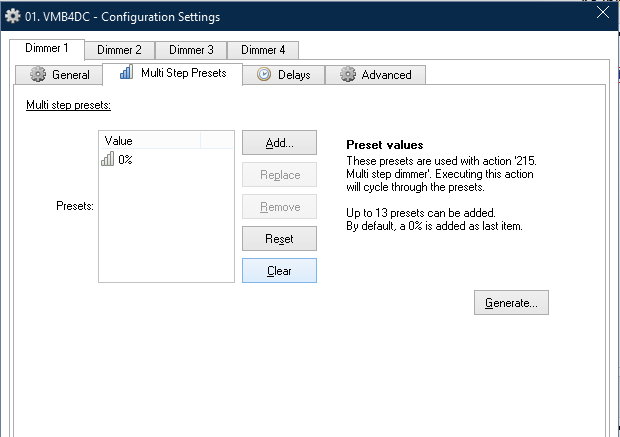
Setup the Dimmer’s "multiStep feature. to JUST TWO STEPS
Right click, configure dimmer
Choose Channel (if a VMB4DC for example)
Choose “multi Step preset”
“CLEAR” all steps
To give you this -----
Then think carefully about the next bit. (order is important, especially for power failure recovery)
“Add” a single step, to whatever you want the “night time” maximum to be.
In this case, 20%
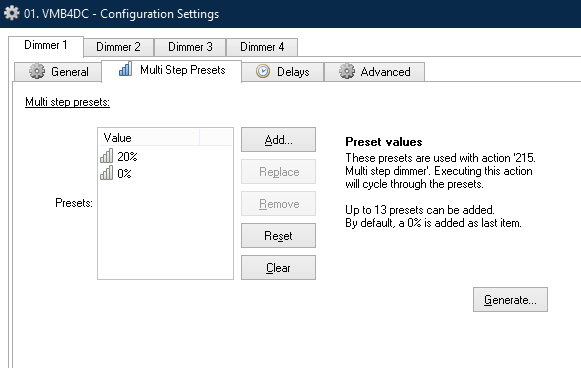
Note that the 20% is at the top of the list
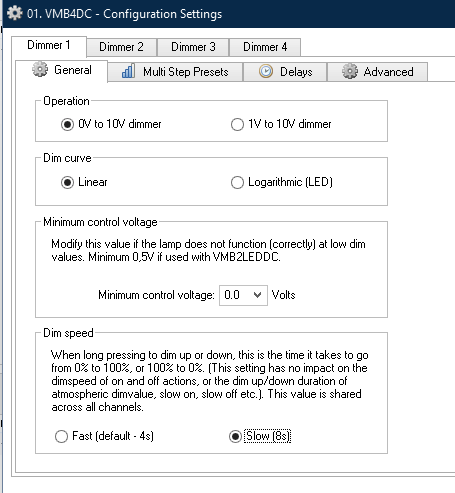
I also like to slow down the dim speed, on the General Tab
Now add the action to the night time virtual relay mimic.
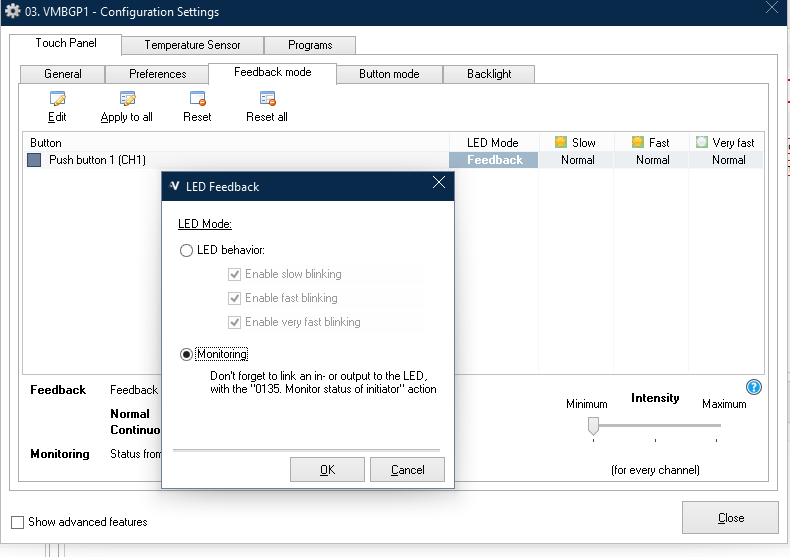
There is only one step remaining, which isn’t essential, unless you want the status from the Light to be
indicated by the button.
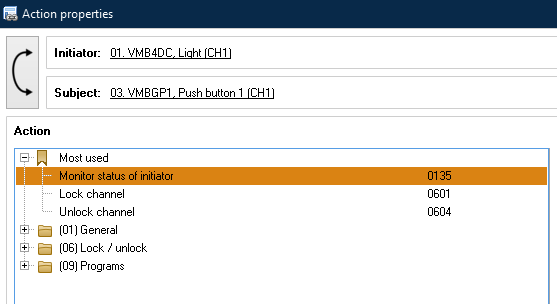
Configure the input module and set the button feedback mode to “Monitoring”
Now add an “0135 Monitor” action between the Light channel (as initiator) and the Button (as subject)
That’s it.
All done.
You should now have a situation where the light will only dim between 0% and 20% at night, as defined by the Velbus Wake up and BedTime timers.
set night time limits.vlp (14.9 KB)
Okay
So this is easier logic, I’ll show the Node-RED way, only because it’s easier to show graphically.
The openHAB way is exactly the same logic, just created slightly differently.
The Node-RED palettes in use here are
Velbus node-red-contrib-velbus
Time-of-day node-red-contrib-time-of-day
Velbus node is set to monitor channel 1 of a VMB4DC
(there is a bug in the palette that limits to Channel 1 only, if you ever use this and want more channels, there is a RAW data method that works perfectly, I’m just using this node for simplicty)
The output from this node is the current value of the dimmer channel.
A “switch” node is used to only pass the message if the value is greater than 20.
It then passes to a “time of Day” node, set to pass the value only if it is during the “allowed” period, in this case, “is it night” between 21:00 and 07:00
The message is then passed back to the Velbus node to trigger a command to the dimmer.
Which is fixed at 20%
(I’ve used link in and out nodes to keep the flow tidy
The simply logic behind this flow is :-
The dimmer value changes
Is the new value more than 20%?
Is it night time?
Yes - Send a command to the dimmer to set 20%
[
    {
        "id": "c120d00516413ffc",
        "type": "tab",
        "label": "Limit night time level",
        "disabled": false,
        "info": "",
        "env": []
    },
    {
        "id": "cbf522f217c14d20",
        "type": "velbus-dimmer",
        "z": "c120d00516413ffc",
        "name": "Dim to 20%",
        "connector": "7814f66e.e42578",
        "commands": "20",
        "commandsType": "VALUE",
        "address": 1,
        "addressType": "3",
        "channel": 1,
        "x": 530,
        "y": 280,
        "wires": [
            [
                "514e7170a8c04981"
            ]
        ]
    },
    {
        "id": "1819d203d401e5a3",
        "type": "time-of-day",
        "z": "c120d00516413ffc",
        "name": "Is it nigt time?",
        "startTime": "21:00:00",
        "endTime": "07:00:00",
        "outputs": 1,
        "x": 1000,
        "y": 280,
        "wires": [
            [
                "3cad6198d09671ad"
            ]
        ]
    },
    {
        "id": "ee69e8eaa934934f",
        "type": "link in",
        "z": "c120d00516413ffc",
        "name": "Limit at NIght (IN)",
        "links": [
            "3cad6198d09671ad"
        ],
        "x": 375,
        "y": 280,
        "wires": [
            [
                "cbf522f217c14d20"
            ]
        ]
    },
    {
        "id": "3cad6198d09671ad",
        "type": "link out",
        "z": "c120d00516413ffc",
        "name": "Limit at night (OUT)",
        "mode": "link",
        "links": [
            "ee69e8eaa934934f"
        ],
        "x": 1155,
        "y": 280,
        "wires": []
    },
    {
        "id": "514e7170a8c04981",
        "type": "switch",
        "z": "c120d00516413ffc",
        "name": "Is it greater than 20?",
        "property": "payload",
        "propertyType": "msg",
        "rules": [
            {
                "t": "lt",
                "v": "20",
                "vt": "num"
            }
        ],
        "checkall": "true",
        "repair": false,
        "outputs": 1,
        "x": 760,
        "y": 280,
        "wires": [
            [
                "1819d203d401e5a3"
            ]
        ]
    }
]
This flow has everything other than the Velbus node connection configuration.
I’m happy to help you set that up, as and when.
(It’s not hard, I just don’t want to confuse the issue right now)
Thanks MDAR for all your support
I followed exactly on the Velbus only route for now and for some reason I can’t get the Clock Alarm Program to be active (like on your screenshot). When I tried the lights during the night they still came on as 100% rather than the dim value.
I went on the module and enabled the clock (via Operate) but doesn’t stay enabled.
Unless you have a power outage, the clock should remain.
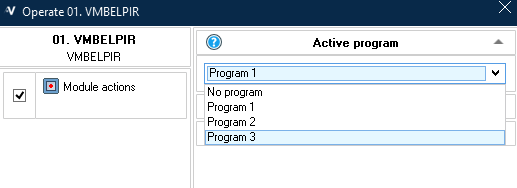
The only other thing I forgot to mention is the setting of the active Program.
Example - (I can’t enable this for virtual modules, I have to use a live one)
Click on “operate” of the module (as you have done already)
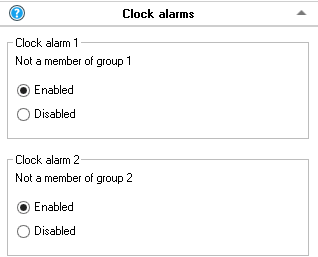
And the same for the Clock Alarm
That said
You can just use FIXED times in your panels if you prefer
These do not rely on the status of the Clock Alarm etc, but they do rely on the “Active Program” option
(shown here in Grey, because it is a virtual module)
Hi MDAR,
Thanks - I don’t have spare actual live modules only virtual and unable to make the Program active.
Any other way I could tackle this using virtual modules?
FYI
Virtual Modules only exist in VelbusLink for installers to design systems prior to getting to a live system. (You can move programing from a Virtual module to live module very easily)
They have no impact on real world situation.
Can we look at how you are accessing the Program Group selection?
It really shouldn’t be difficult, so I am thinking there is a small step that we are missing.
Can you confirm that you are connected to a live system when trying to change the program group?